
Wednesday, December 15, 2010


Monday, December 13, 2010
Pizza Casserole

Pizza Casserole
yields: 8 servings
1 Tbsp. olive oil
1 medium onion, chopped
2 sweet yellow, red or green peppers, cut in large dices
2 medium size zucchini cut into rounds
2 cloves of garlic, chopped
3 cans ready diced tomatoes, drained. (salt free)
1 lb. chicken/pork sausage, cooked
1 Tsp. dried Italian seasoning
1 Tsp. salt
1/2 Tsp. pepper
1/4 cup grated Parmesan cheese
2 cups mozzarella cheese
1 tube refrigerated bread sticks
1. Heat oven to 350 degrees Fahrenheit. Grease a 9x13 baking dish. Heat oil in large skillet over medium- high heat. Add onion and peppers, cook for 5 minutes. Add zucchini and garlic; cook for 5 minutes until barely tender. 2. Add tomatoes, sausage, Italian seasoning, salt, and pepper; cook until somewhat dry, 5 to 7 minutes. 3. Add 2 tbsp. Parmesan cheese, spoon half of into prepared baking dish. 4. Top with 1 cup mozzarella. Add remaining tomato mixture. 5. Arrange bread sticks on top in a lattice pattern. Sprinkle with the remaining cheeses. Bake at 350 degrees Fahrenheit for 25 minutes.

Wednesday, December 8, 2010

Monday, December 6, 2010
Philly Chili Cheese Dip
Philly Chili Cheese Dip
2 cans Nalley's Chili (I use turkey chili, less fat)
1 16 oz. container of Philadelphia cream cheese, softened
2 cups Tillamook medium cheddar cheese
2 tbsp. chopped cilantro (optional)
Spread cream cheese onto bottom of a pie plate; top with chili and cheddar cheese. Bake at 400 degrees Farenheit for 20 minutes or until cheese is melted and dip is heated thoroughly. Sprinkle with cilantro.
Serve with chips or ritz crackers. Enjoy!
Sunday, December 5, 2010
Sunday Stroll
My weekly finds of wonderful decorating inspirations and ideas. Enjoy!
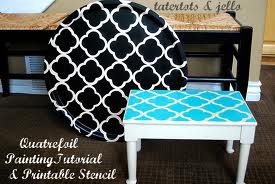
This week: Quatrefoil
 |
| zunigainteriors.blogspot.com |
 |
| livinglivelier.blogspot.com |
 |
| zunigainteriors.blogspot.com |
 |
| thecsiproject.com |
 |
| evadesigns.com |
 |
| collins-dupont.com |
 |
| becolorful.typepad.com |
 |
| evadesigns.com |
Saturday, December 4, 2010
Pinecone wreaths take that, Ballard {part 1}
So if you have been following my blog lately, then you'll know my relationship with Ballard Designs is a little on the rocks. Instead of wallowing in my own sorrows, I've decided to be proactive. Revenge is a dish best served cold, right? Prepare Ballard for the cold shoulder. My first project, was inspired by these Ballard Design's wreaths I saw in their latest holiday catalog. The large pine cone wreaths retail at $99!

{THEIR'S}

{MINE}
You can bet your bottom, I didn't pay anywhere close to that for my knock off project! Here is the run down of my d.i.y. holiday project.


{THEIR'S}

{MINE}
You can bet your bottom, I didn't pay anywhere close to that for my knock off project! Here is the run down of my d.i.y. holiday project.
2 Foam floral wreaths: $2.00 {dollar tree}
2 Cinnamon scented pine cones: $8.00{walmart}
*Jute twine: free!{dollar tree}
*Polka dot fabric: another freebie!{ fat quarters at craft warehouse}
Brown ribbon: $1.97 {walmart}
TOTAL: $11.97!!!! {for two wreaths}
*{items purchased from earlier projects}
That is a savings of $186.03. :) Oh Ballard, I told you to be careful. Muuahhaaaa! {evil laugh}

*HOT TIP: if your going to use jute twine I suggest finding one that is thick in diameter. I ran out of my fatter twine and had to use some skinny stuff and it took FOREVER!!! Learn from my mistake, thin is not in!
Since, I'm going to great lengths {literally, excuse the wordy post} I might as well do a little tutorial on how to make these wreaths.
* My first attempt at a tutorial so hopefully it makes sense!

Step 1: Tie a knot with your jute twine around your wreath, then proceed to start wrapping your wreath with the twine. You'll want the twine to be wrapped very close together so that the green foam doesn't show through. When you've covered your entire wreath and are back at the starting point make another knot to tie it off. You can either glue down the straggler string that's left after the knot or weave it back into the wreath.
{Block out a good chunk of time to do step 1, watch your favorite t.v. show, or wait for the kiddo's nap time.}
Step 2: Now that you've wrapped your wreath you can start hot gluing your pine cones. There really is no right or wrong way to do this, just slap on some glue and arrange it where you like. I chose not to cover the entire wreath with pine cones, but you can certainly do that and it will still look just as great.

Step 3: Tie a ribbon at the top of your wreath in order for it to hang on a wall.

{You can also flock your pine cones to make it look more like the Ballard wreath, I left mine as is so I could keep them up year round, if I want.}
Step 4: If you choose to make the exact wreath I made, you will need ribbon or fabric to make a bow for the top of your wreath. Glue down ribbon or fabric, and your done! That's it, you have a beautiful wreath {or two} to hang in your home all year long.


Now you might say HEY! Those don't look exactly like the Ballard wreaths. Yeah, yeah, yeah. I know they aren't exactly the same. But I'm an individual, I like my stuff to reflect me and these wreaths do just that. They are one of a kind, and I like it that way! Oh, oops, excuse me, while I hop down from my soap box now. :)
I hope you enjoy making your own holiday wreaths this year! Enjoy!
My next Ballard Designs vengeful inspired project will be a pine cone topiary. Keep a look out for that upcoming post.
Wednesday, December 1, 2010

Subscribe to:
Posts (Atom)
LinkWithin
